写这个已经过了很久的的时间了 当时写好没写博客是因为怕这个有额外的问题,现在经过实验 表现的都还没不错 在10min内成绩提醒就会发送到你自己指定的邮箱 我会把代码开源放入Github,当然我也会隐去我自己的信息。
这篇博客也会教大家怎么使用他
准备
IDEA+springboot框架+Maven+jsoup+httpclient
首先去教务系统网页 新的教务系统有验证码验证 ,但是还好我以前收藏了一个不用验证码的网站
湖南工业大学教务系统网站 :http://218.75.197.123:83/jsxsd/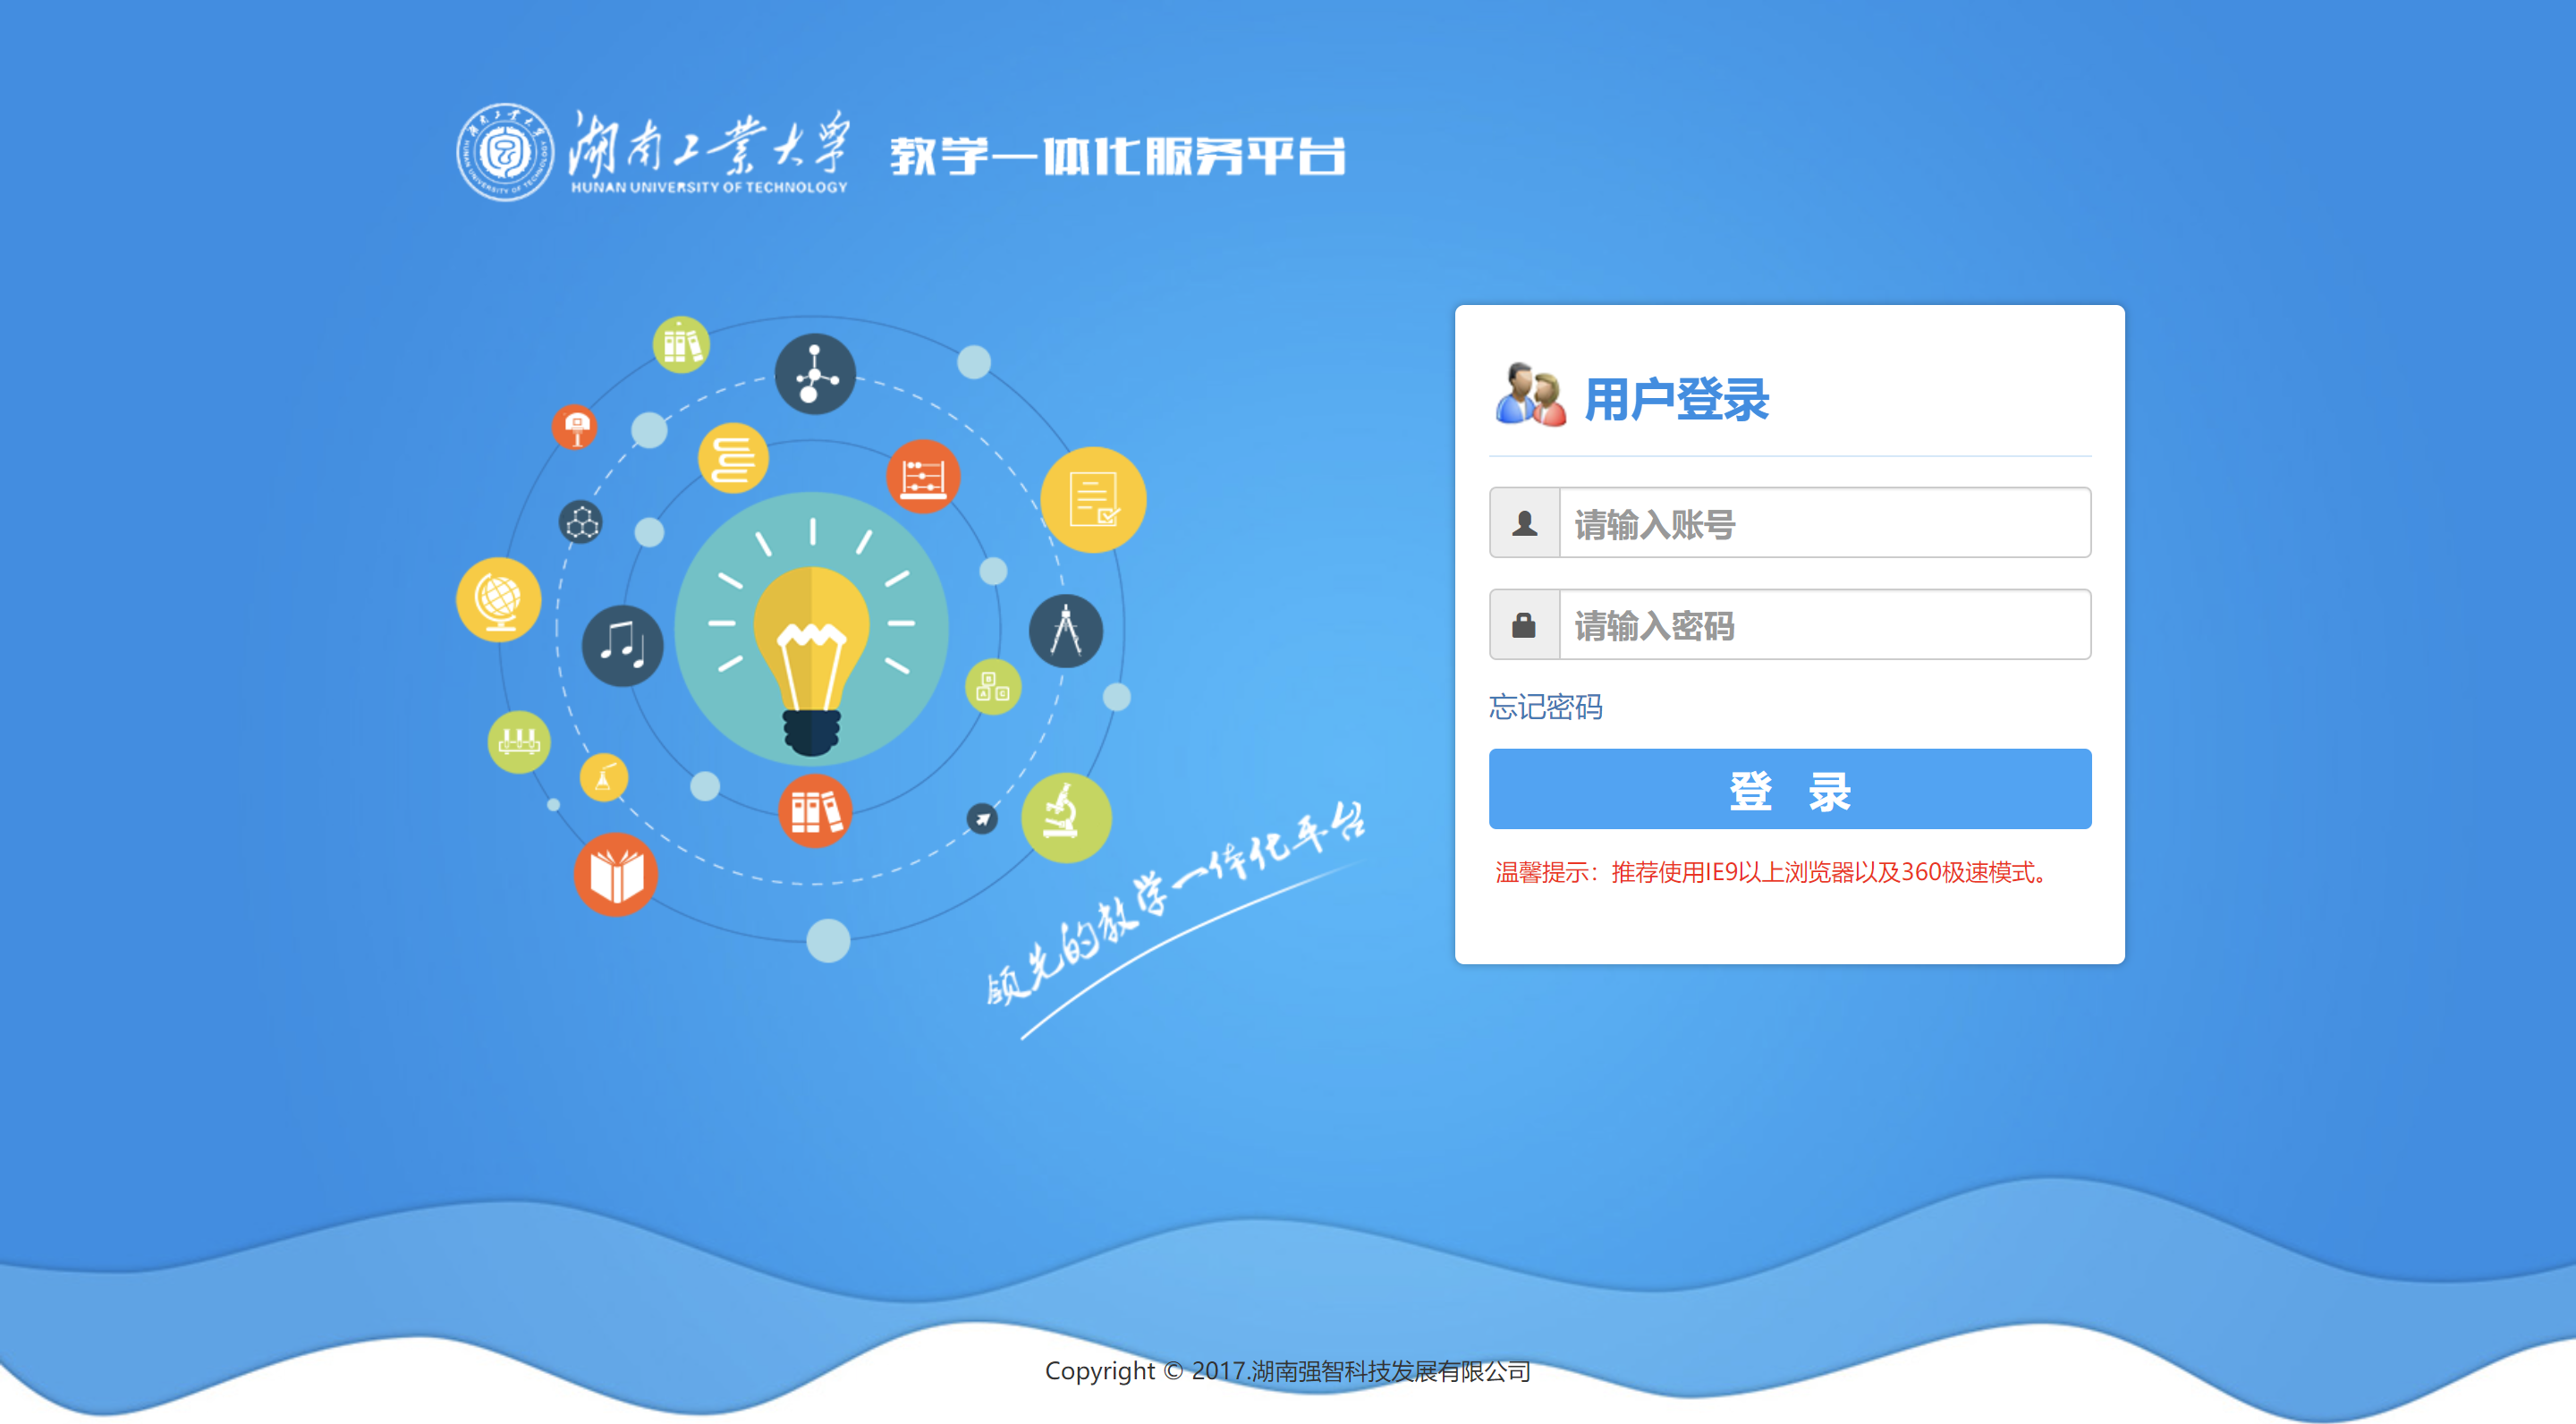
按F12 然后找到network(网络这一项) 登陆系统
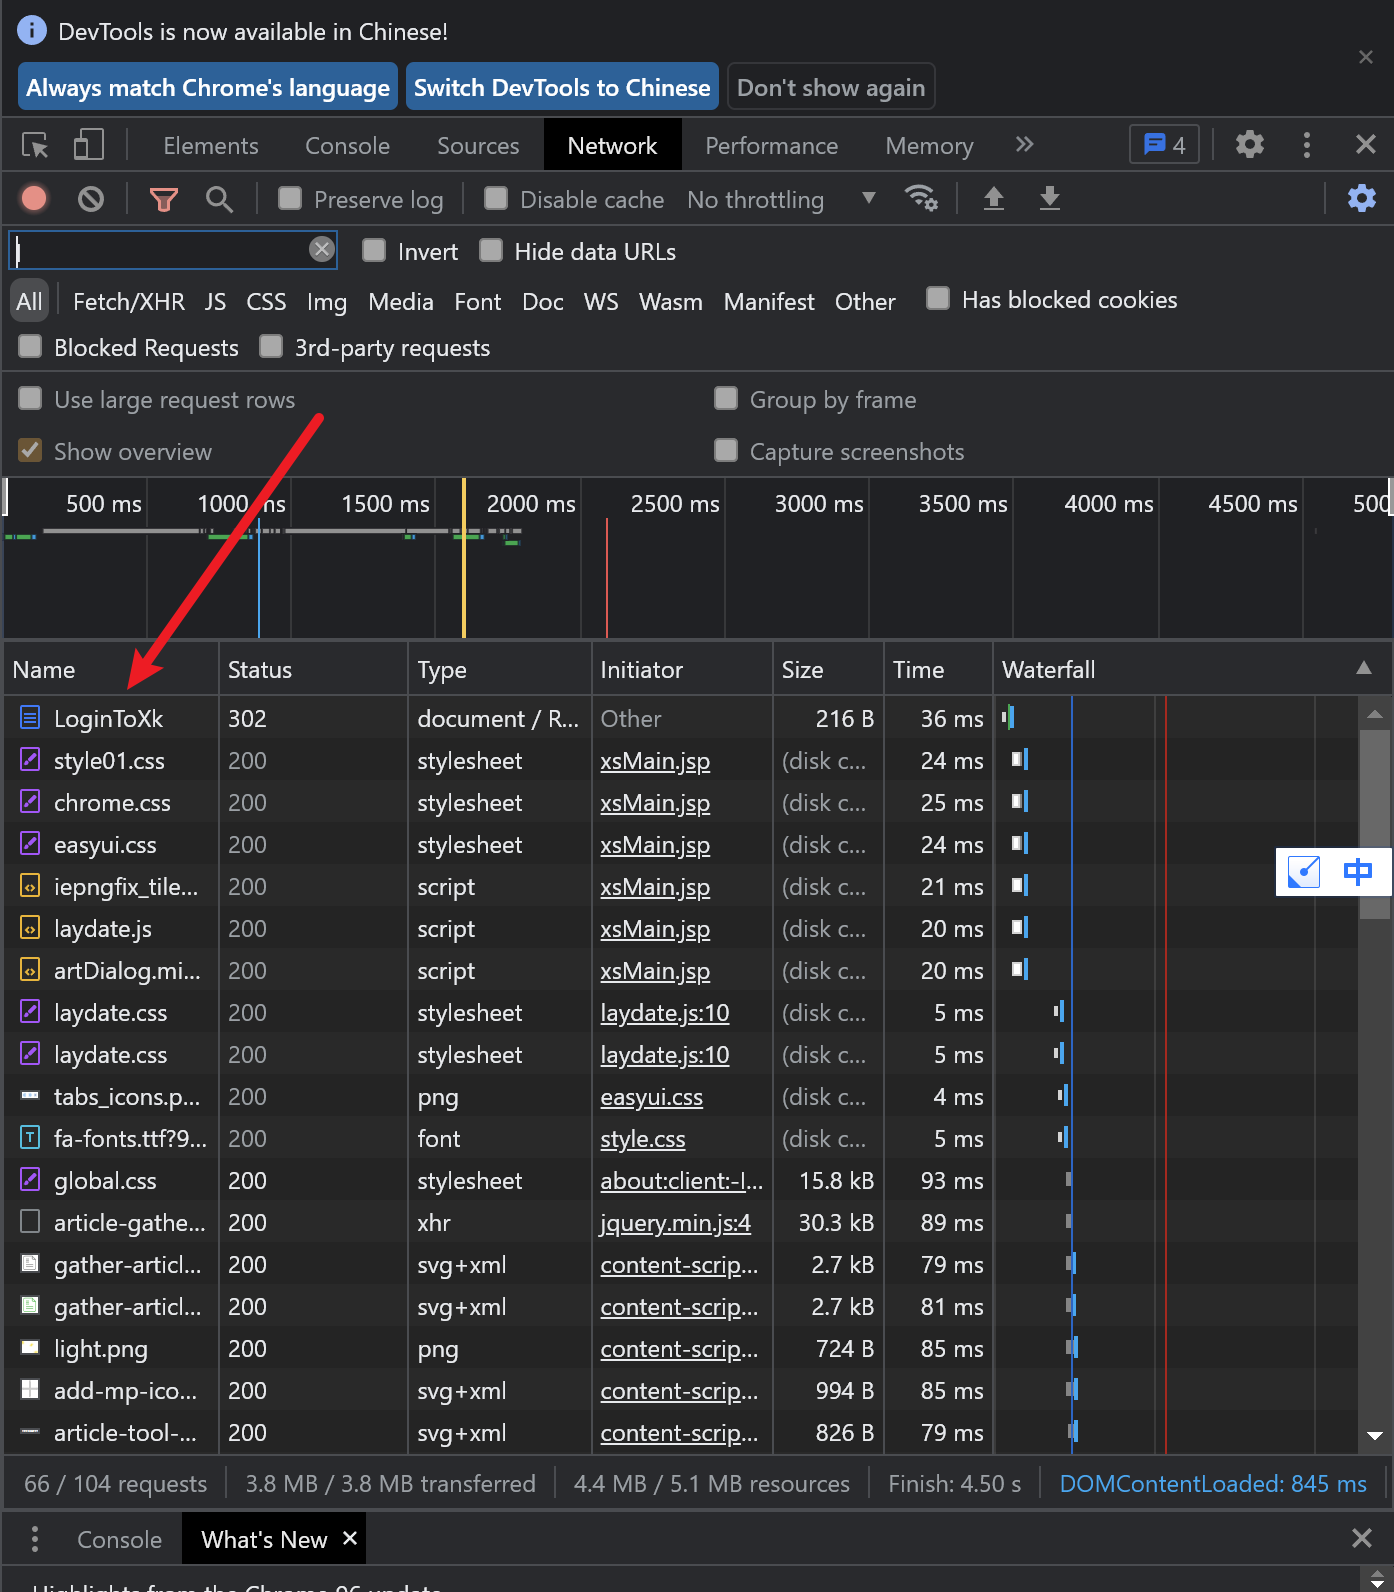
找到这一项 点开 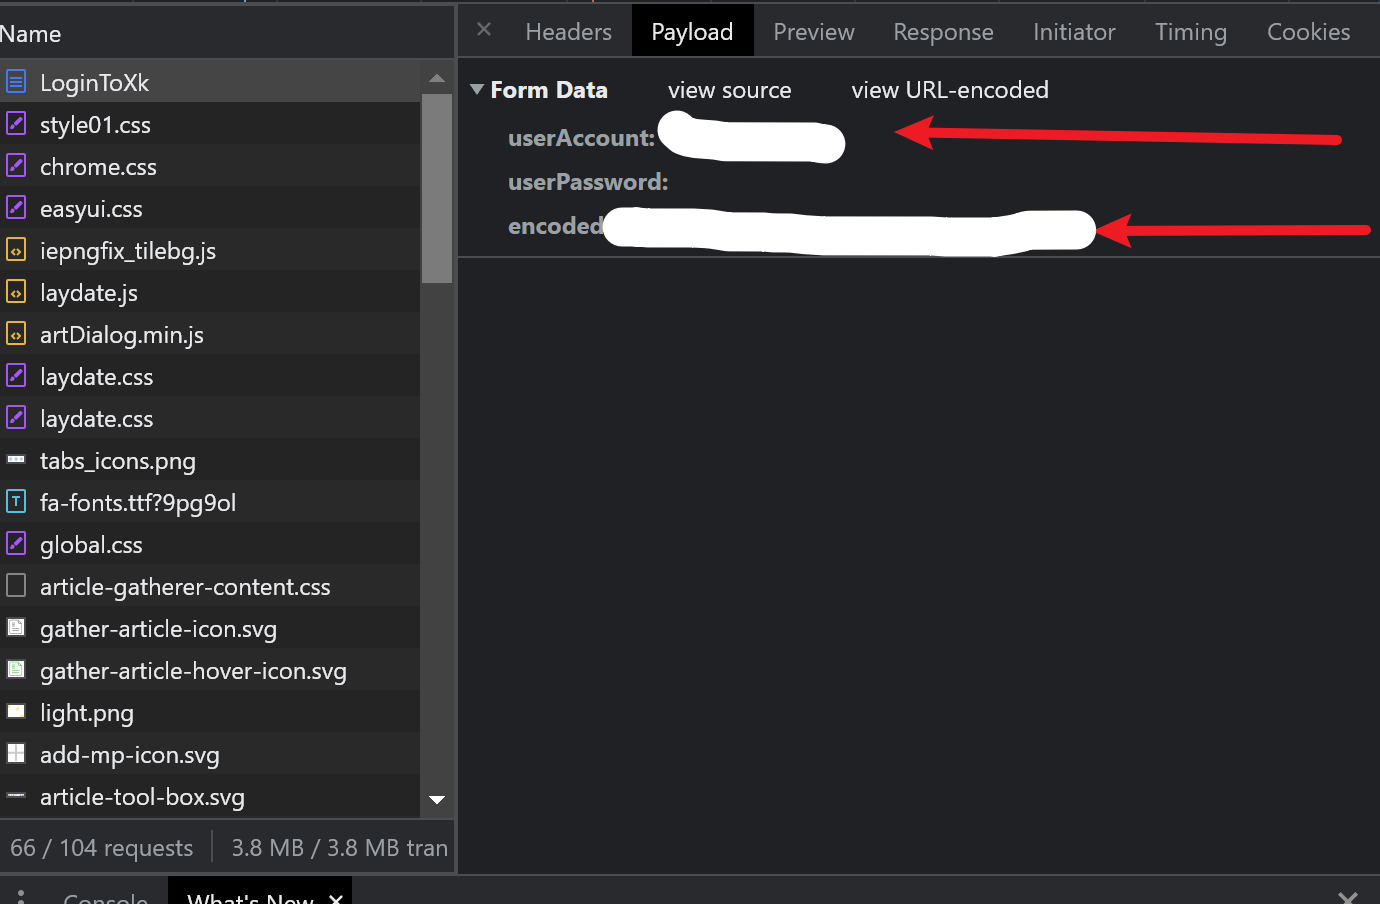
记录下这个的信息 userAccount即是学号 encodedd是学号+密码的base64加密
maven依赖
1
2
3
4
5
6
7
8
9
10
11
12
13
14
15
16
17
18
19
20
21
22
23
24
25
26
27
28
29
30
31
32
33
34
35
36
37
38
39
40
41
42
43
44
45
46
47
48
49
50
51
52
53
54
55
56
57
58
59
60
61
62
63
64
65
66
67
68
69
70
71
72
73
74
75
76
77
78
79
80
81
82
83
84
85
86
87
| <?xml version="1.0" encoding="UTF-8"?>
<project xmlns="http://maven.apache.org/POM/4.0.0" xmlns:xsi="http://www.w3.org/2001/XMLSchema-instance"
xsi:schemaLocation="http://maven.apache.org/POM/4.0.0 https://maven.apache.org/xsd/maven-4.0.0.xsd">
<modelVersion>4.0.0</modelVersion>
<parent>
<groupId>org.springframework.boot</groupId>
<artifactId>spring-boot-starter-parent</artifactId>
<version>2.6.2</version>
<relativePath/>
</parent>
<groupId>com.example</groupId>
<artifactId>JWXT</artifactId>
<version>0.0.1-SNAPSHOT</version>
<name>JWXT</name>
<description>JWXT</description>
<properties>
<java.version>1.8</java.version>
</properties>
<dependencies>
<dependency>
<groupId>org.springframework.boot</groupId>
<artifactId>spring-boot-starter</artifactId>
</dependency>
<dependency>
<groupId>org.jsoup</groupId>
<artifactId>jsoup</artifactId>
<version>1.10.3</version>
</dependency>
<dependency>
<groupId>org.springframework.boot</groupId>
<artifactId>spring-boot-starter-mail</artifactId>
<version>2.5.4</version>
</dependency>
<dependency>
<groupId>org.apache.commons</groupId>
<artifactId>commons-lang3</artifactId>
<version>3.7</version>
</dependency>
<dependency>
<groupId>javax.mail</groupId>
<artifactId>mail</artifactId>
<version>1.4.7</version>
</dependency>
<dependency>
<groupId>org.apache.httpcomponents</groupId>
<artifactId>httpclient</artifactId>
<version>4.5.6</version>
</dependency>
<dependency>
<groupId>org.apache.httpcomponents</groupId>
<artifactId>httpclient</artifactId>
<version>4.3.4</version>
</dependency>
<dependency>
<groupId>com.alibaba</groupId>
<artifactId>fastjson</artifactId>
<version>1.2.51</version>
</dependency>
<dependency>
<groupId>cn.hutool</groupId>
<artifactId>hutool-all</artifactId>
<version>5.1.0</version>
</dependency>
<dependency>
<groupId>org.springframework.boot</groupId>
<artifactId>spring-boot-starter-test</artifactId>
<scope>test</scope>
</dependency>
</dependencies>
<build>
<plugins>
<plugin>
<groupId>org.springframework.boot</groupId>
<artifactId>spring-boot-maven-plugin</artifactId>
</plugin>
</plugins>
</build>
</project>
|
在IDEA新建Springboot框架 然后在新建类LoginPZ
1
2
3
4
5
6
7
8
9
10
11
12
13
14
15
16
17
18
19
20
21
22
23
24
25
26
27
28
29
30
31
32
33
34
35
36
37
38
39
40
41
42
43
44
45
46
47
48
49
50
51
52
53
54
55
56
57
58
59
60
61
62
63
64
65
66
67
68
69
70
71
72
73
74
75
76
77
| package com.example.jwxt;
import org.apache.http.NameValuePair;
import org.apache.http.client.entity.UrlEncodedFormEntity;
import org.apache.http.client.methods.CloseableHttpResponse;
import org.apache.http.client.methods.HttpGet;
import org.apache.http.client.methods.HttpPost;
import org.apache.http.client.protocol.HttpClientContext;
import org.apache.http.cookie.Cookie;
import org.apache.http.impl.client.CloseableHttpClient;
import org.apache.http.impl.client.HttpClients;
import org.apache.http.message.BasicNameValuePair;
import java.io.IOException;
import java.net.URI;
import java.util.ArrayList;
import java.util.HashMap;
import java.util.List;
import java.util.Map;
public class LoginPz {
public static String hello() {
Map<String,String> param = new HashMap<>();
String userAccount = "你的学号";
String userPassword = "密码";
String encoded = "上文提到的加密信息";
param.put("userAccount",userAccount);
param.put("userPassword",userPassword);
param.put("encoded",encoded);
List<URI> redirectLocations = null;
CloseableHttpClient httpClient = HttpClients.createDefault();
CloseableHttpResponse response = null;
String resultString = "";
try {
HttpPost httpPost = new HttpPost("http://218.75.197.123:83/jsxsd/xk/LoginToXk");
httpPost.addHeader("Content-Type","application/x-www-form-urlencoded");
httpPost.addHeader("Cookie","JSESSIONID=22B4C4CE6240C6C53FF6BC3C197E3B83; SERVERID=121; JSESSIONID=8FFFAEA49DC840CE5A3135330C06CED3");
if (param != null) {
List<NameValuePair> paramList = new ArrayList<>();
for (String key : param.keySet()) {
paramList.add(new BasicNameValuePair(key, param.get(key)));
}
UrlEncodedFormEntity entity = new UrlEncodedFormEntity(paramList);
httpPost.setEntity(entity);
}
HttpClientContext context = HttpClientContext.create();
response = httpClient.execute(httpPost,context);
List<Cookie> cookies = context.getCookieStore().getCookies();
for (Cookie cookie : cookies) {
String name = cookie.getName();
String value = cookie.getValue();
return value;
}
} catch (Exception e) {
e.printStackTrace();
} finally {
try {
response.close();
} catch (IOException e) {
e.printStackTrace();
}
}
return " ";
}
}
|
这是模拟教务系统登陆 然后我们新建类GetUserInfo
代码如下
1
2
3
4
5
6
7
8
9
10
11
12
13
14
15
16
17
18
19
20
21
22
23
24
25
26
27
28
29
30
31
32
33
34
35
36
37
38
39
40
41
42
43
44
45
46
47
48
49
50
51
52
53
54
55
56
57
58
59
60
61
62
63
64
65
66
67
68
69
70
71
72
73
74
75
76
77
78
79
80
81
82
83
84
85
86
87
88
89
90
91
92
93
94
95
96
97
98
99
100
101
102
103
104
105
106
107
108
109
110
111
112
113
114
115
| package com.example.jwxt;
import org.apache.http.client.methods.CloseableHttpResponse;
import org.apache.http.client.methods.HttpGet;
import org.apache.http.impl.client.CloseableHttpClient;
import org.apache.http.impl.client.HttpClients;
import org.apache.http.util.EntityUtils;
import org.jsoup.Jsoup;
import org.jsoup.nodes.Document;
import org.jsoup.nodes.Element;
import org.jsoup.select.Elements;
import java.util.ArrayList;
import java.util.List;
import java.util.Timer;
import java.util.stream.Collectors;
public class GetUserInfo {
static int idx = 0;
public static void cj() throws Exception {
for (int i = 0; i < 1000000000; ) {
LoginPz loginPz = new LoginPz();
String cookies = loginPz.hello();
CloseableHttpClient httpClient = HttpClients.createDefault();
try {
HttpGet httpGet = new HttpGet("http://218.75.197.123:83/jsxsd/kscj/cjcx_list?kksj=2021-2022-1");
httpGet.addHeader("Cookie", "JSESSIONID" + "=" + cookies + "; SERVERID=121; JSESSIONID=8FFFAEA49DC840CE5A3135330C06CED3");
httpGet.addHeader("User-Agent", "Mozilla/5.0 (Windows NT 10.0; Win64; x64) AppleWebKit/537.36 (KHTML, like Gecko) Chrome/96.0.4664.110 Safari/537.36");
httpGet.addHeader("Accept", "text/html,application/xhtml+xml,application/xml;q=0.9,image/avif,image/webp,image/apng,*/*;q=0.8,application/signed-exchange;v=b3;q=0.9");
httpGet.addHeader("Connection", "keep-alive");
CloseableHttpResponse response = httpClient.execute(httpGet);
String html = EntityUtils.toString(response.getEntity(), "utf8");
Document parse = Jsoup.parse(html);
parseHtml(parse);
Thread thread = new Thread();
thread.sleep(600000);
} catch (Exception e) {
}
}
}
private static void parseHtml(Document parse) throws Exception {
Element table = parse.getElementById("dataList");
Elements cells = table.select("tr");
StringBuilder stringBuilder = new StringBuilder();
List<List<String>> tables = new ArrayList<>();
for (int index = 1; index < cells.size(); index++) {
Element row = cells.get(index);
Elements rows = row.select("td");
List<String> dataList = new ArrayList<>();
for (Element element : rows) {
dataList.add(element.text());
}
tables.add(dataList);
}
Elements headers = cells.get(0).select("th");
List<String> tableHeader = headers.stream()
.map(Element::text)
.collect(Collectors.toList());
for (String str : tableHeader) {
System.out.printf(str + " ");
stringBuilder.append(str + " ");
}
stringBuilder.append("\r\n");
System.out.println("");
for (List<String> strs : tables) {
for (String str : strs) {
System.out.printf(str + " ");
stringBuilder.append(str + " ");
}
stringBuilder.append("\r\n");
System.out.println("");
}
System.out.println();
if (tables.size() > idx)
{
System.out.println("这是一个标志");
SendMailUtil.sendEmail("你的邮箱 xxxx@qq.com", "成绩更新", stringBuilder.toString());
idx = tables.size();
}
}
}
|
新建发邮件的类SendMailUtil
邮箱建议使用qq邮箱 需要拿到授权码
1
2
3
4
5
6
7
8
9
10
11
12
13
14
15
16
17
18
19
20
21
22
23
24
25
26
27
28
29
30
31
32
33
34
35
36
37
38
39
40
41
42
43
44
45
46
47
48
49
50
51
52
53
54
55
56
57
58
59
60
61
62
63
64
65
66
67
68
69
70
71
72
73
74
75
76
77
78
79
80
81
82
83
84
85
86
87
88
89
90
91
92
93
94
95
96
97
98
99
100
101
102
103
104
105
106
107
108
109
110
111
112
113
| package com.example.jwxt;
import java.io.FileOutputStream;
import java.io.OutputStream;
import java.text.SimpleDateFormat;
import java.util.Date;
import java.util.Properties;
import javax.mail.Address;
import javax.mail.Message;
import javax.mail.Session;
import javax.mail.Transport;
import javax.mail.internet.InternetAddress;
import javax.mail.internet.MimeMessage;
import com.sun.mail.util.MailSSLSocketFactory;
public class SendMailUtil {
private static String myEmailSMTPHost = "smtp.qq.com";
private static String myEmailAccount = "xx@qq.com";
private static String myEmailPassword = "授权码 需要自己去qq邮箱拿";
public static void sendEmail(String toEmailAddress, String emailTitle, String emailContent) throws Exception{
Properties props = new Properties();
props.setProperty("mail.debug", "true");
props.setProperty("mail.smtp.auth", "true");
props.put("mail.smtp.port", 465);
props.setProperty("mail.smtp.host", myEmailSMTPHost);
props.setProperty("mail.transport.protocol", "smtp");
MailSSLSocketFactory sf = new MailSSLSocketFactory();
sf.setTrustAllHosts(true);
props.put("mail.smtp.ssl.enable", "true");
props.put("mail.smtp.ssl.socketFactory", sf);
Session session = Session.getInstance(props);
Message msg = new MimeMessage(session);
msg.setSubject(emailTitle);
StringBuilder builder = new StringBuilder();
builder.append("\n" + emailContent);
msg.setSentDate(new Date());
msg.setText(builder.toString());
msg.setFrom(new InternetAddress(myEmailAccount,"我的工作站", "UTF-8"));
Transport transport = session.getTransport();
transport.connect( myEmailSMTPHost, myEmailAccount, myEmailPassword);
transport.sendMessage(msg, new Address[] { new InternetAddress(toEmailAddress) });
OutputStream out = new FileOutputStream("MyEmail.eml");
msg.writeTo(out);
out.flush();
out.close();
transport.close();
}
}
|
拿授权码过程
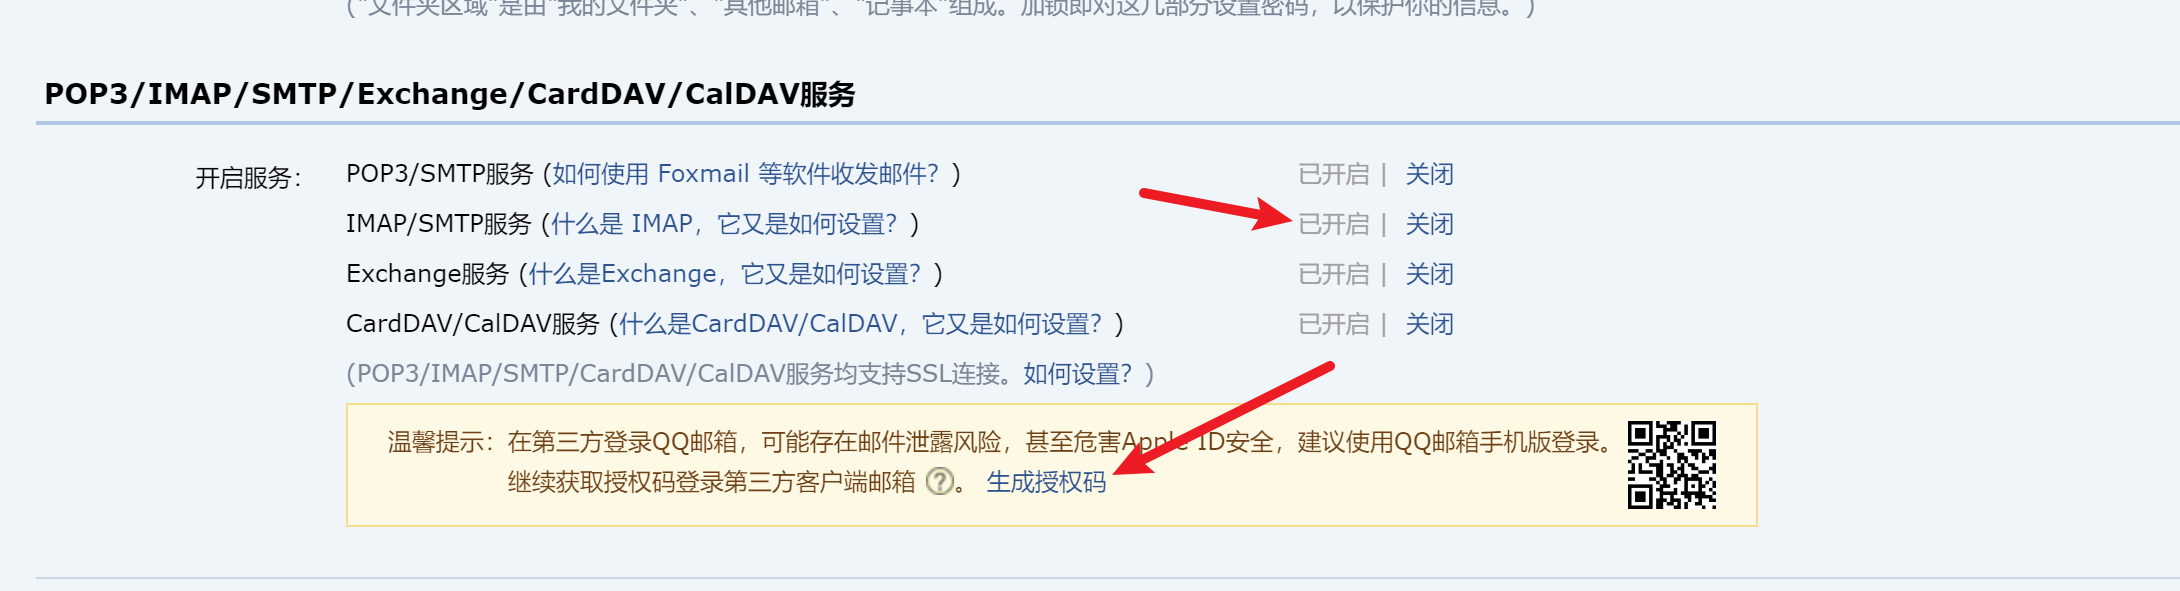
拿到授权码之后复制到上面去
再到Application添加启动类
1
2
3
4
5
6
7
8
9
10
11
12
13
14
15
16
| package com.example.jwxt;
import org.springframework.boot.SpringApplication;
import org.springframework.boot.autoconfigure.SpringBootApplication;
@SpringBootApplication
public class JwxtApplication {
public static void main(String[] args) throws Exception {
SpringApplication.run(JwxtApplication.class, args);
GetUserInfo getUserInfo = new GetUserInfo();
getUserInfo.cj();
}
}
|
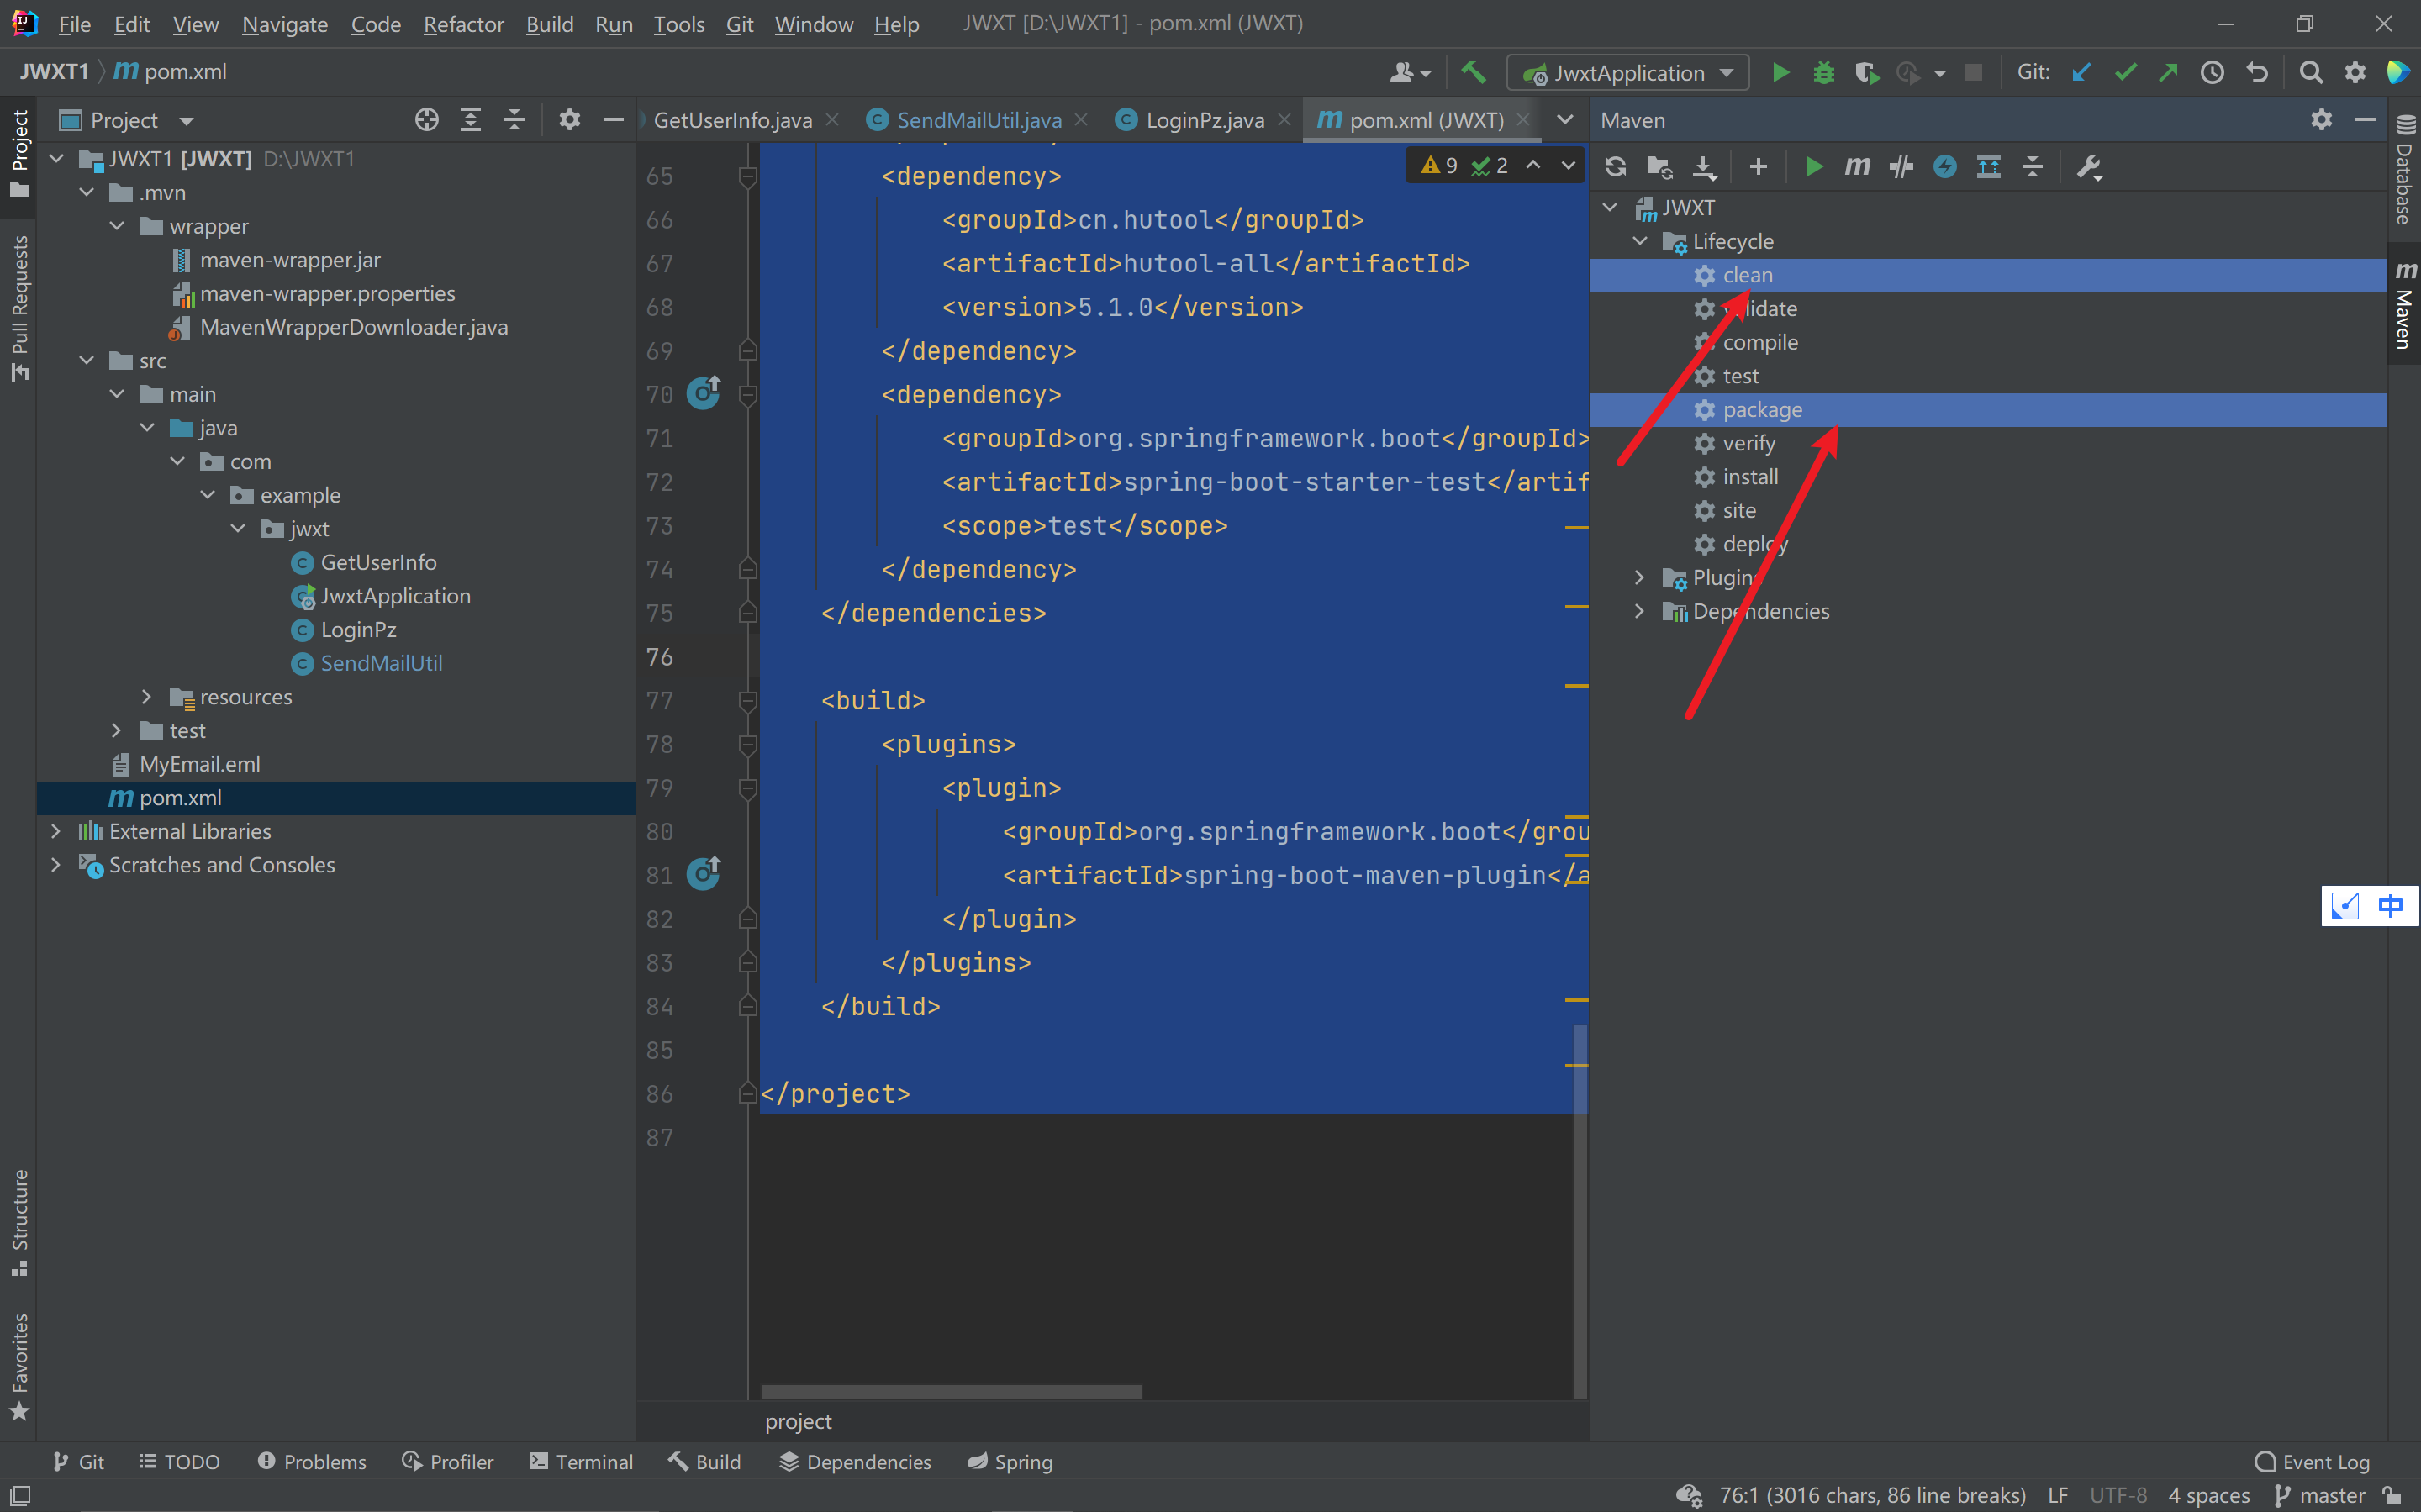
如果自己有服务器就把这个项目打包成jar包上跑起来
没有的话只能把项目一直跑着不关
打jar包

用xshell+xftp把文件传入服务器上

然后用xshell 一直cd到jar包所在的路径
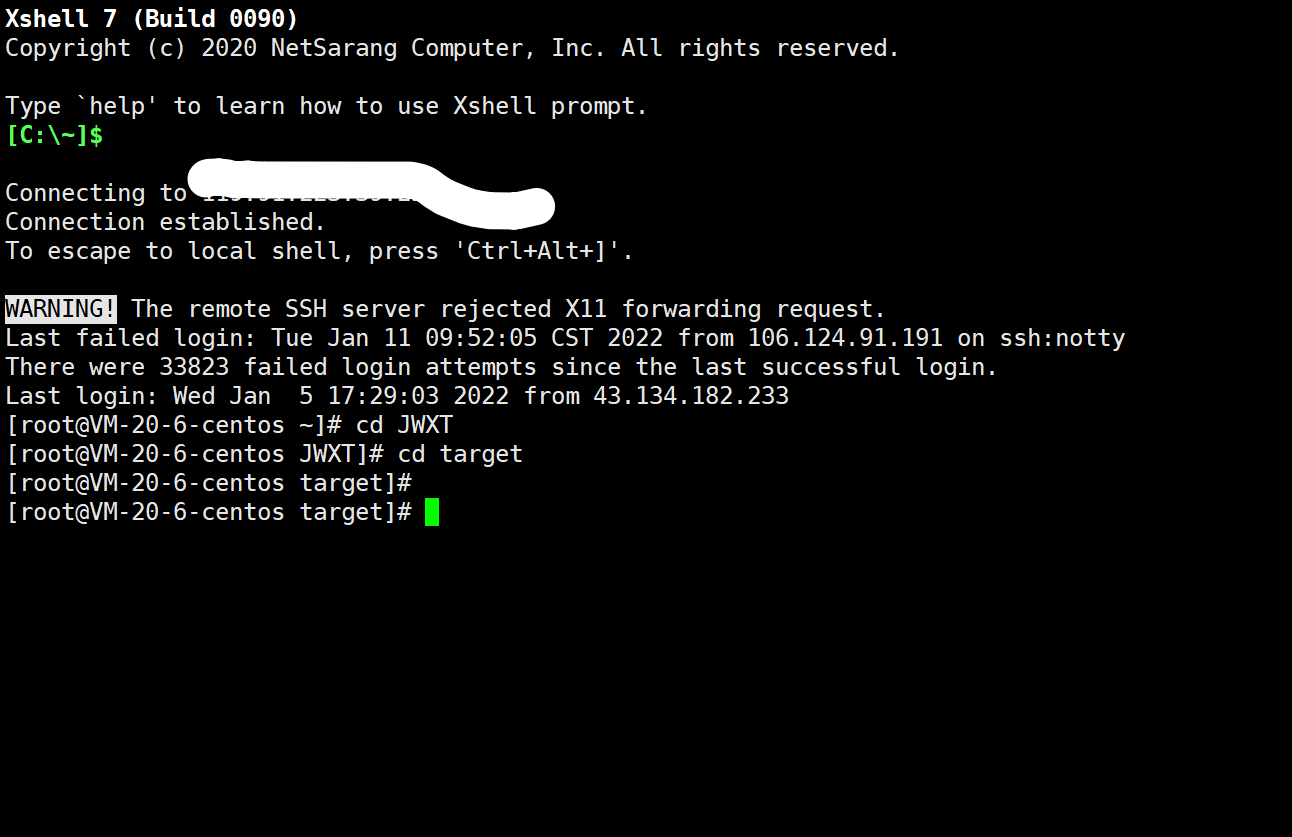
使用命令
1
| nohup java -jar JWXT-0.0.1-SNAPSHOT.jar 2>&1 &
|
然后就大功告成了 一般你跑起来之后就会收到一封邮件提醒
github的项目地址 https://github.com/fengxiaop/JWXT
如果有用的话请你动动你的小手点点star 因为这无疑是对我巨大的鼓励。